

The OAuth 2.0 (Open Authorization) is the standard which provides API Security via access token meaning it provides the authorization only not authentication where as OpenID connect provides user authentication and single sign-on functionality.
How OpenID connect works?
- User attempt to login Anypoint Platform using below URL https://anypoint.mulesoft.com/accounts/login/{your_org_domain}
- Anypoint redirect to identity providers like Okta OIDC
- Login Page as a HTML form is redirected to user
- User enters the Okta credentials and same credentials is pushed to Okta
- Okta authorize api will be called and it will generate the authorization code and push to Anypoint as a service provider
- Anypoint calls token api to get the token
- Anypoint gets the user info with the help of token
- Post successful above steps Anypoint home rendered to user
Difference between SAML and OIDC
|
SAML |
OpenID Connect (OIDC) |
|
It is XML based |
It is JSON based |
|
Slow performance |
Fast Performance |
|
Built for traditional apps like
HTML Form apps |
Built for modern apps like HTML
form apps or Single page apps or native mobile apps |
|
|
|
Anypoint provides two ways of client registration with OpenID Connect Identity Management Provider.
- Manual Registration
- Dynamic Registration
Lets Setup OpenID Connect (OIDC) Manually
1. Login to Okta
Create an application : By creating application client ID and Client Secret will be generated
Go to Application and click on Create App Integration

Create New app integration by choosing Sign-in Method and Application type.
Select OIDC - Open ID Connect as a Sign-in Method --> This is the token based OAuth 2.0 authentication for Single-Sign-On(SSO) through API endpoints and
select Web-application as an application type --> This are the server side applications where authentication and tokens are handled on the server for example (MuleSoft, Java, PHP etc)

Then click next and enter the following details
App Integration Name: Okta OIDC Manual Demo
Grant type: There will be two options
Option1: Client acting on behalf of itself and this will contain Client Credentials
Option2: Client acting on behalf of user and this will have values like below
- Authorization Code
- Interaction Code
- Refresh Token
- Implicit (hybrid)
Select Option1 i.e. client acting on behalf of itself and select the value Client Credentials and keep Option2 as it is
Enter the Sign-in redirect URL: Okta sends the authentication response and ID token for user's sign-in request to these URIs. Provide any dummy url of Anypoint like login url and after configuration of Anypoint, actual redirect URL will generate at Anypoint.
Once redirect URL will generate at Anypoint then you have to replace in Okta with this generated URL

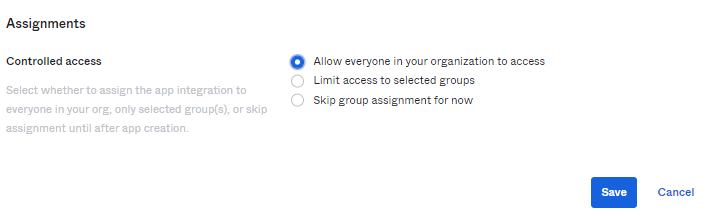
Then under assignment section, select allow everyone in your organization to access as Controlled access then click save. After this step you will get Client ID and Client Secret copy these values and keep into notepad as these values will be used at Anypoint
Now Okta configuration is done !!!
Lets start configuration at Anypoint
Login to Anypoint and navigate to Identity Provider and click on Add Identity Provider and select Open ID Connect and enter the following details
There are total four sections
Section 1: Name: OpenID Connect Manual Identity provider Okta
Section 2: Identity Client Registration
In this section click on Use manual registration
As soon as you select manual registration client ID and Client Secret option will be visible enter the Client ID and Client Secret copied from Okta
Note: When manually registering a client for OpenID Connect identity management, use the redirect URI generated after saving this configuration and this redirect URI will be replaced in Okta that initially provided dummy redirect URL
Section3: Open ID Connect Authorization URLs
Here you need to provide
OpenID Connect Issuer
Autorize URL
Token URL
User Info URL
Now question is how to get these URLs?
These URLs belongs to Okta as Authorization server. To get these URLs GOTO Okta and navigate to security and click on API. click on default authorization server then copy the Metadata URI

Open the metadata uri in browser and it will contain token, authorization and issuer url like below for user info https://dev-10006408.okta.com/oauth2/default/v1/userinfo will be used

Section 4: Advance Setting
Here you need to provide Group Scope, Group Attribute JSON Expression and Disable server certificate validation
Enter these URLs into Anypoint and click save

Change at Anypoint is done now copy the redirect url from above step performed at Anypoint and replace into Okta like below
https://anypoint.mulesoft.com/accounts/login/abcorganization/providers/dce8984a-ef90-458e-8124-010390538b2d/redirect
Goto Application and then click on the created app and then click on edit under general setting and move to login section and replace the above URL for Sign-in redirect URLs and click save

Enter the url https://anypoint.mulesoft.com/login/domain/abcorganization into browser
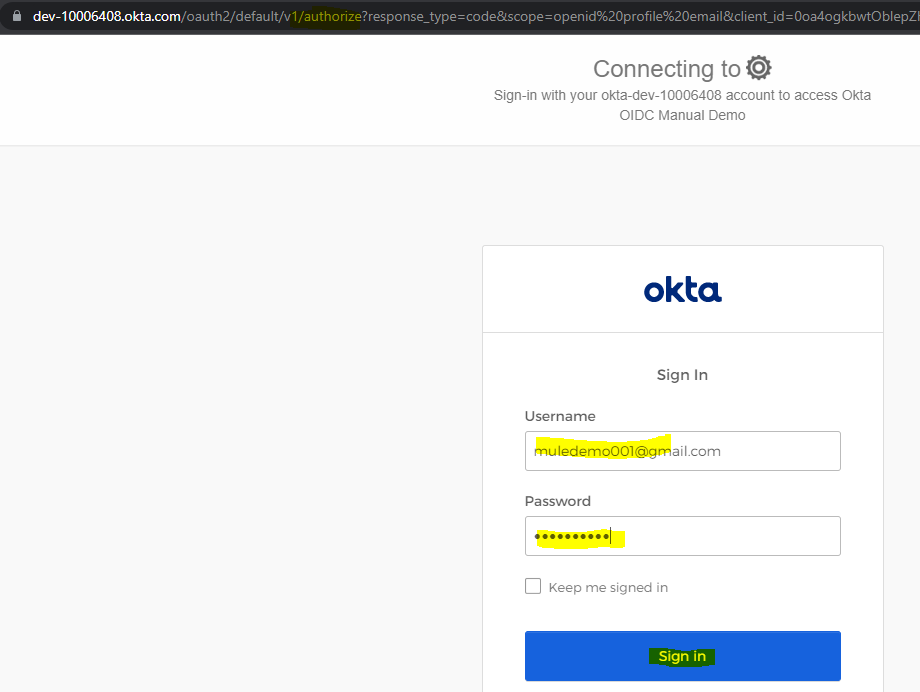
it will redirect to Okta login page and then select Continue with OpenID Connect Manual Identity Provider

As soon as you click it will redirect to authorize URL and where you need to provide the Okta user name and password like below
Post successful authorize, token will be generated and based on token validation and user info, Anypoint home page will be rendered to user

References

No comments:
Post a Comment